Pillowcase Dress:
PATTERN FOR THE PEASANT DRESS
Materials needed:
- About a yard of fabric (the sleeve uses about 1/4 yard or a fat quarter.)
- Elastic
- Pattern pieces (click to download)
- size 2t/3t & 4/7 bodice pattern
- size 2t/3t & 4/7 sleeve pattern
- size 12/18 mo bodice pattern
- size 12/18 mo sleeve pattern)
- Fabric marker or fabric chalk
- Scissors
- Ruler
- Iron
- Basic sewing supplies
Important pattern printing tip
When printing the patterns, do not print directly from Google Docs. Download the pattern to your computer and open it in Adobe Reader. Choose "Actual Size" and "Landscape" options to make sure it prints at the right size.Instructions:
Step 1:
Print your pattern pieces and cut them out. (Print from the links above, not the photos below.)
As you can see, there are two necklines on the bodice pattern piece, You can print it twice or just use a Tracing Wheel and Tracing Paper to mark the front neckline on the fabric. (This technique is shown in step 3.)
Step 2:
Get your length measurement.For the perfect length measure your child from armpit to desired dress length Add 1.5 inches to this measurement.
If you don't have a child to measure, here are some guesstimates though it would not hurt to add an inch or two to my numbers to be safe, since you can always shorten the dress;
- 12-18 mo: 13 to 14 inches
- 2t: 15 inches
- 3t: 17 inches
- 4: 19.5 inches
- 5: 21.5 inches
- 6: 23.5 inches

Step 3:
Cutting the fabric.Line up your bodice pattern piece as shown below. Draw out the skirt pattern onto the fabric and cut out the back piece using the back neckline.

Lay out the back piece onto your fabric and use it to cut out the front piece. Then cut the front neckline onto the front piece. You can freehand the shape of the front neckline or use a tracing wheel and paper as shown below:

Cut out 2 sleeves using the sleeve pattern. This is what you will have: 1 Front piece, 1 back piece and 2 sleeves.

Step 4:
Assemble the dress.With the right sides together, line up the sleeve edges with the arm hole edges of the dress front. Sew along this seam (marked in blue) and finish the edge with a serger, zig zag stitch or Pinking Shears.
Grab the back dress piece and line up the other sleeve edges and sew the arm/sleeve edges the same way

When you are done with this step the pieces will connect like below. (Don't laugh at the drawings)

Next, line up the front and back pieces and sew down the sleeve edge all the way to the bottom of the dress, Do both sides and finish the seam edge with your preferred method.

To create the neck casing, fold the edge of the neckline in 1/4 inch and press. Fold the neckline over another half inch and press again. Use pins if needed, but be careful not to melt your pin heads!

Stitch along the edge of the casing, a scant 1/8 inch from the folded edge. Leave a 1.5 inch opening in the casing to insert the elastic.

Cut your elastic according to this guide. Keep in mind you may want to cinch up your neck line more or less depending on how the dress is fitting:
- 12 to 18 months: 15 to 16 inches
- 2t/3t: 17 to 20 inches
- 4/6: 20 to 22 inches
- 7: 22 to 24 inches
Sew the elastic ends together, being careful not to twist them, using a wide zigzag stitch and trim any excess elastic. Finish sewing the elastic casing closed.

Step 5:
Hemming the bottom of the dress.Fold the bottom edge over 1/2 inch, press, fold over another 1/2 inch press again and sew along the folded edge.
Step 6:
Sleeve finishing options:To finish the sleeves of your peasant dress, you have a couple of options; shirring the sleeve edge, creating a casing and adding elastic or just hemming.
Here are some examples of the different sleeve options and the instructions to do them:
1. Shirring the sleeve edge:

Fold the sleeve edge over 1/4 inch, press, fold another 1/4 inch press again and sew along the folded edge. With elastic thread on your bobbin, add 3 to 4 rows of shirring, 1/4 inch apart. For a more detailed shirring tutorial, see the shirred sundress tutorial.
2. Adding a casing. The arm casings are created just like the neck casing.

(This was a 12 month version made a few months ago)
Here are some elastic cutting guide lengths for the arms:
- 12 to 18 months: 7 inches
- 2t/3t: 8 inches
- 4/6: 9 inches
- 7: 9 to 9.5 inches

That is it! Your peasant dress is done! Go have your little one try it on and pose for a few pictures to share!
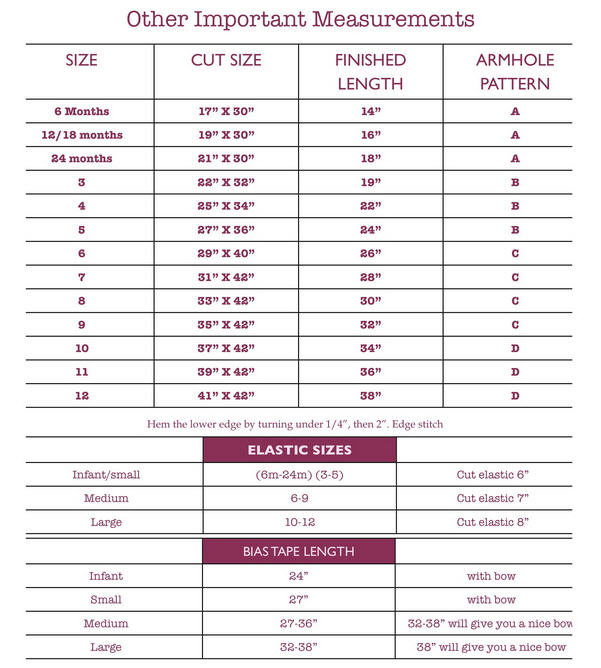
We have an updated measurement chart for DAG... email me at suzannewithdressagirl@gmail.com
ReplyDelete